You don't need to write a line of code to connect Stripe to Discord. If you've been putting off automating your paid community because the tech felt out of reach, this is the guide that removes that excuse.
Stripe to Discord automation without code is possible with n8n — a visual workflow builder that connects APIs through a drag-and-drop canvas. Here's exactly how it works.
What you're actually building
The goal is simple: when someone pays via Stripe, they get instant Discord access. When they cancel or their payment fails, that access is removed automatically. No manual role assignment. No checking Stripe and hopping over to Discord. No members sitting in limbo waiting for you.
The automation sits between Stripe and Discord and handles every lifecycle event — new payment, cancellation, failed payment, recovery — without you involved.
The tools you need
Three tools, all of which have generous free tiers or low-cost starting plans:
- Stripe — your payment processor. You likely already have this.
- Discord — your community platform. You have this too.
- n8n — the automation layer in the middle. n8n cloud starts at around £20/month. You can also self-host it for under £10/month on a basic VPS. No coding required to use it — it's a visual canvas where you connect nodes.
You'll also need a Discord bot (created in a few clicks via the Discord Developer Portal at no cost) and a member database — Airtable's free plan handles this perfectly.
The Discord user ID challenge
Before you build anything, understand the key technical requirement: Stripe knows your members by email. Discord needs a user ID. These don't naturally connect.
The no-code solution is an OAuth join flow. After payment, you redirect the member to a Discord authorisation page. They log in, Discord hands you their user ID, and you store it in Airtable linked to their Stripe email. n8n then uses this link for every future automation trigger.
Tools like Whop, LaunchPass, and Memberful can handle this OAuth step for you without any setup — they're essentially no-code layers on top of exactly this integration. If you want the simplest possible Stripe to Discord automation without any configuration, start there.
If you want more control and lower ongoing costs, build it yourself in n8n using the steps below.
Setting up your Discord bot
Go to discord.com/developers/applications and create a new application. Under the Bot section, create a bot and copy the token. Under OAuth2, add your server's redirect URL.
In your Discord server, go to Server Settings → Roles and drag your bot's role above every member role in the list. This is critical — Discord only lets bots manage roles positioned below their own in the hierarchy.
Invite the bot to your server with the correct permissions: Manage Roles, Send Messages, and Create DMs.
Building the Stripe to Discord workflow in n8n
Open n8n and create a new workflow. Every node here is configured via a form — no coding.
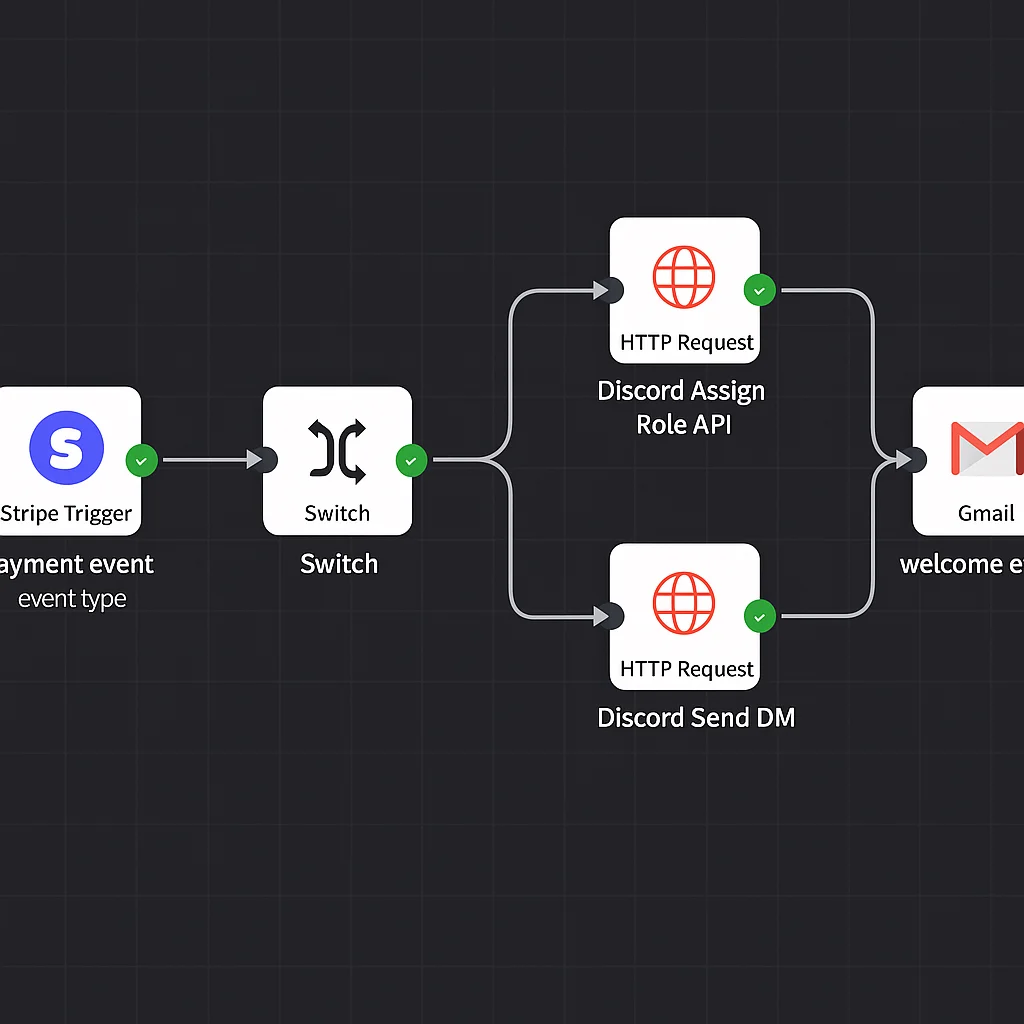
Node 1: Webhook
Add a Webhook trigger node. Copy the webhook URL it generates. Go to your Stripe dashboard → Developers → Webhooks and paste this URL as a new endpoint. Select these events: checkout.session.completed, customer.subscription.deleted, invoice.payment_failed, invoice.payment_succeeded.
Node 2: Switch
Add a Switch node. Set it to route based on {{$json.body.type}} (the Stripe event type). Create routes for each event type you're handling.
Node 3: Airtable lookup
Add an Airtable node set to Search Records. Configure it to search your member table where the Email field matches {{$json.body.data.object.customer_email}}. This returns the Discord user ID you stored during the OAuth join flow.
Node 4: HTTP Request — assign role
Add an HTTP Request node. Set Method to PUT, URL to https://discord.com/api/v10/guilds/YOUR_GUILD_ID/members/{{$json.discord_user_id}}/roles/YOUR_ROLE_ID. In Headers, add Authorization: Bot YOUR_BOT_TOKEN. No coding — just fill in the form fields.
Node 5: HTTP Request — send welcome DM
First create the DM channel: POST to https://discord.com/api/v10/users/@me/channels with body {"recipient_id": "{{$json.discord_user_id}}"}. Then send the message to the returned channel ID.
Handling the off-boarding side
The cancellation flow is the same structure in reverse. When customer.subscription.deleted fires, your Switch node routes it to a branch that:
- Looks up the Discord user ID from Airtable
- Calls
DELETE /guilds/{guild_id}/members/{user_id}/roles/{role_id}to remove the role - Sends an offboarding DM
- Triggers your email win-back sequence
For failed payments, add a Wait node (set to 4 days) between the dunning DM and the role removal. If the payment recovers within that window, a separate invoice.payment_succeeded branch cancels the removal and sends a confirmation DM.
Testing before going live
Stripe has a test mode. Create a test product, use test card 4242 4242 4242 4242, and verify the full flow fires correctly in n8n's execution log before switching to live mode. Check: role assigned, DM sent, Airtable record created. Then test a cancellation. Then test a failed payment.
Don't skip the cancellation and failed payment tests. Those are the flows that protect your revenue.
No-code tools as an alternative
If even n8n feels like too much, platforms like Whop, LaunchPass, and Patreon's Discord integration handle Stripe to Discord automation without any setup at all. The trade-off is monthly fees (typically 3–10% of revenue or a flat subscription) and less flexibility — you get their logic, not yours.
For communities under £1,000 MRR, these platforms often make more sense than a custom n8n build. Above that threshold, the cost difference between a platform fee and a £10/month n8n instance starts to matter meaningfully.
Want to understand exactly how much a properly automated community could earn you? Calculate your community's revenue potential here — it'll help you decide which setup is worth investing in.
If you'd rather have this built properly, book a strategy call and we'll scope it out.